API Billing and Marketplace Setup
API integrations use one of two billing arrangements. Confirm which arrangement Fluxir has enabled for your tenant before you send paid API requests. The API billing-readiness guide explains how to check readiness; that check does not select a billing arrangement or approve credit.
Choose a billing arrangement
Fluxir invoicing with advance balance top-ups
With Fluxir invoicing, you add funds to your Fluxir balance in advance. Fluxir sends an invoice for the top-up amount, and the balance is credited after the invoice is paid. This is not postpaid credit: API usage must be covered by available balance before it is billed.
There is no option to use a credit account unless that arrangement has been explicitly agreed with the relevant Fluxir stakeholders. Do not assume that an invoice, a billing-readiness response, or a Marketplace subscription grants credit terms.
Follow the steps below to request and pay a top-up in the Travel Agencies Portal. The top-up invoice API reference describes the corresponding API operation for integrations that need to request an invoice programmatically.
Microsoft Billing through Azure Marketplace
With Microsoft Billing, subscribe to the Fluxir offer through Azure Marketplace. Charges are handled through the Azure subscription and according to the Fluxir offer and plan terms shown during purchase. Review those terms in Azure before completing the purchase; they can vary by plan and subscription eligibility.
Use one arrangement as configured for your tenant. Contact your Fluxir account contact if you need to confirm or change the arrangement before integrating.
Top up your balance in the Travel Agencies Portal
- Sign in to the Travel Agencies Portal with an account that has permission to manage billing for the relevant agency.
- If you manage more than one tenant, select the agency or target tenant whose balance you intend to fund.
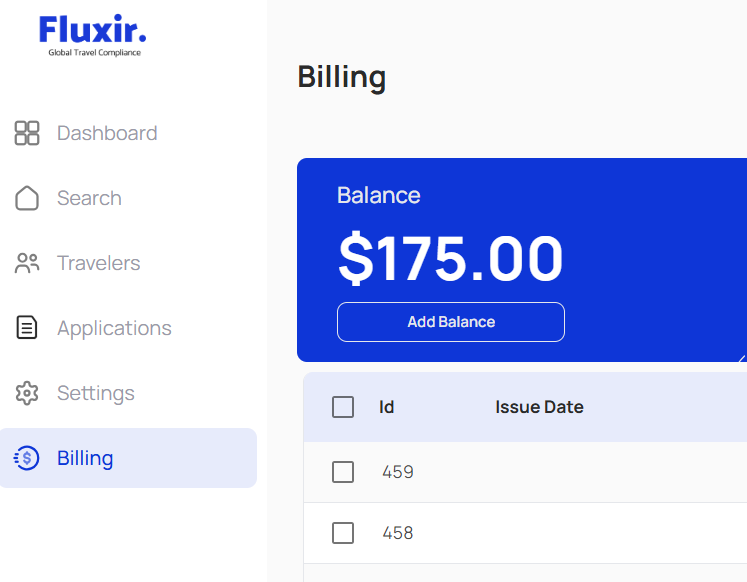
- Open the Billing page and review the displayed balance. Click the Add Balance button.
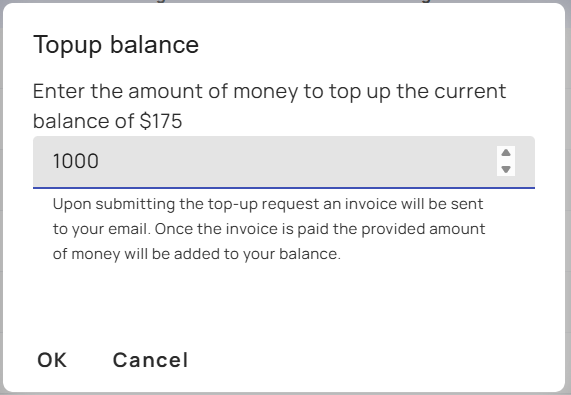
- In the appeared dialog, enter the amount to add to your balance and select OK to request the top-up invoice. Selecting Cancel closes the dialog without submitting the request.
- A top-up invoice will be generated and sent to your email. You can see it appearing in the list first with the status Taken For Sending.

- In a couple of seconds, the status of the invoice will change to Sent once it has been successfully sent to your email.

- Pay the invoice sent to your email. You can also open the invoice from the Billing page and use its payment link when one is available.
- After payment is processed, return to Billing and confirm that the balance reflects the top-up before submitting paid API work.
The portal creates an invoice when you submit a top-up request. The funds are added after that invoice is paid; submitting the request alone does not add funds or authorize deferred payment.
What you'll see in the portal
On the Billing page, the current balance appears next to the Add action when invoice-based billing is enabled for the selected agency. Selecting Add opens a dialog that displays the current balance, an amount field, and a note that an invoice will be sent by email. OK submits the top-up request; Cancel closes the dialog without submitting it.
After the request, find the invoice in the Billing list. Review its amount and status, then use its payment link if one is available. The balance is updated after the invoice payment is processed. Keep the invoice and payment details private when sharing portal information with support.
Create an Azure account and subscribe to Fluxir
If your organization already has an Azure account and an eligible subscription, use that account and continue to the Marketplace purchase steps. Otherwise, use Microsoft's Azure account sign-up page to create an account. An Azure account and an Azure subscription are related but distinct: the subscription is where the Marketplace purchase is associated and billed.
If you need a subscription, follow Microsoft's instructions to create an Azure subscription. That article covers Microsoft Customer Agreement subscriptions; your organization may use a different billing agreement or require an administrator to create the subscription. Ask your Azure administrator for help if you do not have subscription-creation access.
Before buying, make sure the Azure subscription is eligible for Marketplace purchases and has a valid payment method. The purchasing user also needs the required Marketplace and subscription/resource-group permissions. Microsoft's Marketplace roles and permissions page lists the required access. Some subscription types, regions, or organization policies can prevent a purchase.
Then purchase the Fluxir offer:
- Sign in to the Azure portal using the account and directory associated with the subscription you will use for billing.
- Open Marketplace or select Create a resource, then search for Fluxir. Confirm that the publisher is Fluxir and that the offer and plan are the ones provided or approved by your Fluxir contact. If you cannot find the offer, ask Fluxir whether it is available to your Azure region, subscription, or tenant.
- Open the offer, review the plan, pricing, billing frequency, trial terms if any, auto-renewal setting, and publisher terms. Select Subscribe or Get it now to begin.
- On the purchase screens, verify the Azure subscription, SaaS subscription name, plan, and any requested resource group and contact information. Review the total and terms, then select Complete purchase.
- Wait for the purchase to finish. Follow Azure's prompt to configure or activate the SaaS subscription. If activation is not automatic, complete the publisher setup step before the offer's activation window expires.
- When redirected to Fluxir, sign in with the Microsoft account associated with the Marketplace purchase and create or connect the Fluxir workspace as prompted. Confirm that the Fluxir page shows the expected offer, subscription, and plan. Contact Fluxir if the subscription is not linked to the intended workspace.
Microsoft's complete walkthrough is How to purchase a SaaS offer in the Azure portal. Fluxir's Marketplace subscription resolution API reference documents the Marketplace return flow used by the portal; it is not a replacement for purchasing and activating the offer in Azure.
What you'll see during setup
In Azure Marketplace, the Fluxir offer page shows the publisher, available plan or plans, and their pricing terms. The purchase review asks you to confirm the Azure subscription and SaaS subscription details before you complete the purchase. Check these details carefully because Azure associates the purchase with the selected subscription.
After purchase, Azure may ask you to finish activating or configuring the SaaS subscription. The Fluxir return page confirms the recognized offer and displays the subscription name and plan. If you are not already signed in, it prompts you to sign in with Microsoft to link the subscription to a Fluxir workspace. If the page does not show the expected subscription, contact your Fluxir account contact before attempting another purchase.
Do not share Azure credentials, access tokens, or billing details with Fluxir support. For API request behavior after billing is configured, continue with the API billing-readiness guide.